
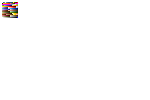
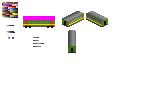
Welcome to the first tutorial. This is where I think you should start, when you're going to draw your first train graphic. First thing you need to know if you want to draw any TT graphics, is that you use the colors from the TT Palette only. The image below contains this palette. I suggest you download this file and paste it in an empty image where you'll soon start drawing in.
Some of the colors are special colors which you shouldn't use: the upper two rows of pixels. In the 4th row, you see 8 pixels of blue color, these are the company colors. When using these colors in your train sprites, this color will be replaced by the color scheme the TT Player selects.
 REVISION

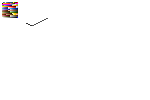
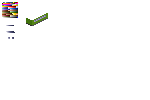
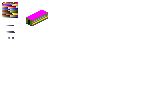
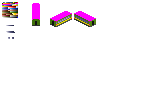
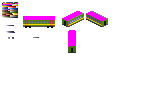
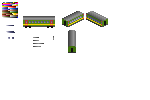
Okay, now we really start drawing. Remember that you can use other colors than I do anytime during the tutorial. The first thing you should see is this:
 Step 1
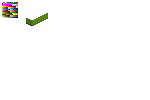
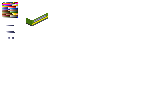
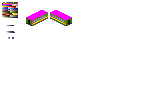
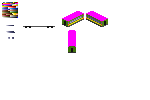
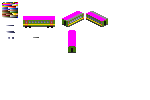
Next thing is drawing the bottom of the coach in / view. I always start drawing the / view, but if you like, you can start anywhere you would like (Although it's easier to follow the tutorial ;) ). Remember that the right faced side is somewhat lighter.
 Step 2
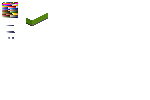
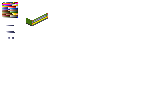
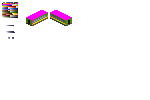
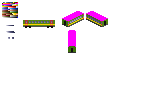
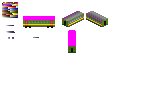
Now pick the main color and draw the shape of the sides.
 Step 3
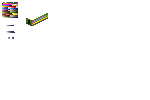
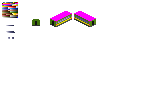
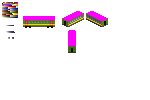
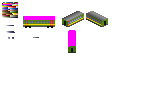
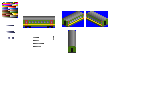
Now we're going to draw the windows. Pick the silver blue color scheme from the palette. Copy it like I did in the image below, so that you've two rows of pixels in a shape like \=======\. Now you select two squares of 2x2 pixels, one somewhat lighter than the other one. These are your windows. Normally windows are 2x2 squares, but sometimes they've another size.
 Step 4
Next thing to do is to copy the lighter window into the sprite multiple times. The darker window is for the left side, which you will need in the \ view.
 Step 5
If you want to draw a line in a coach, you sometimes run into a problem. Below the windows you've 2 pixels of 'green'. If you want to draw a line of 1 pixel in the middle of those 2 pixels green, you can solve this like I did in Step 6.
 Step 6
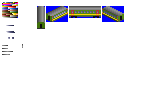
Now we're going to add red doors. If you want those doors to be green, it's better to make them somewhat darker or lighter than the rest of the green. You probably already noticed, especially when drawing a real coach, that the coach is a bit short. You'll have to decrease the number of windows. There only fit 8 windows in a coach, and then you don't have any room for doors and such.
 Step 7
Next thing to do is drawing the door which allows passenger to walk from one coach to another.
 Step 8
Now we're going to draw the shape of the roof. You can pick any color for that, as long as it isn't used already. We will change the color into the final color when we add light effects to it. This is called 'shading'. The roof is one of the last things we're going to shade.
 Step 9
Now we're going to mirror the sprite.
 Step 10
Oh no! The lighting is wrong. We'll have to make the right faced side lighter and the left faced side darker  . Remember to pick colors from the original sprite. And don't forget making the doors, the line and the windows darker. And last but not least, the most lower line, swap colors there.
 Step 11
Now we make a start with the | view. Pick colors from one of the other views and draw the 'front' of the coach. It's 8 pixels width and 7 pixels in height.
 Step 12
Now draw the shape of the roof. (16 pixels in length.)
 Step 13
Next thing is starting with the _ view. Pick the color from the other sprites and draw a line of 32 pixels long. Remember not to pick the darkest color in your sprites.
 Step 14
Now add the wheels, the wheels of the coach are usually only visible in _ view. Use a darker, maybe the darkest, color.
 Step 15
Now draw the rest of the side of the coach.
 Step 16
And draw the doors and windows.
 Step 17
And draw the shape of the roof.
 Step 18
Now we're going to shade the roof. We need 6 colors from light to dark. I advise to choose a part of the lower pixel row in the palette. Copy this somewhere into image.
 Step 19
Pick the second lightest color and draw the most right row of pixels in the roof in both / and \ views.
 Step 20
Now pick the lightest color to draw the next row.
 Step 21
Now draw the rest of the rows until you've 1 row of purple pixels left.
 Step 22
Now draw a thin line of pixels, actually these are individual pixels. Use the second darkest color for this.
 Step 23
Now pick the darkest color and finish the roof in / and \ views.
 Step 24
Now copy the 6 pixels of roof-color. Mirror the copy and connect these two rows with the lightest color overlapping. Then pick the 8 pixels to the left.
 Step 25
Now fill the roof in the | view with these 8 pixels.
 Step 26
Now pick 4 colors for the roof in _ view. First pick the second lightest color for the lowest pixel. Then the lightest pixel for the second lowest pixel. Then some color in the middle for the third pixel. And one of the darkest colors for the 4th pixel. This sounds a bit complicated, but it's really easy, I hope the image of Step 27 is clear enough.
 Step 27
Next thing to do is fill the roof with the four colors you just picked.
 Step 28
Now draw a blue box around your sprites. The lowest right pixel of the palette contains the transparent color. Without this blue box, the sprites would show lots of white in TT, and that's not what we want  .
.
 Step 29
Finally, reorder the sprites like in the image of Step 30. This is to make it easier for the coder.
 Step 30
Congratulations! Your passenger coach is now finished. Convert the file to the .PNG format to post it on the forums  .
.
